

QUIZ QUESTION
Match the component to the correct definition.


The Starter Code for Trivia App
In this lesson, you'll be working with the Android Trivia app. You'll be responsible for wiring together all of the app's navigation, including buttons, a menu, a navigation drawer and more. Because this lesson focuses on navigation, it helps to have a few pre-built fragments to navigate between. We've built these for you in the starter code, which you'll download next.
Download the Code for this Lesson
You have two options for the code in this lesson:
- You can download a zip file of the starter code here
- If you’re familiar with git, you can clone the entire git repository. This includes
//TODOinstructions and solution states for every step of building navigation for the app. To work with the git repository, use the example here: code README to learn how the repos are set up, and how to navigate the code and branches.
Run the Starter Code
1. Open the starter code.
Open up Android Studio and instead of selecting Start a new Android Studio project, click Import project (Gradle, Eclipse ADT, etc.).
When opening the code, if you see pop-ups asking to update the gradle plugin, choose Don't remind me again for this project.
This pop-up occurs when the version of Android Studio that the code was written on is behind the version of Android Studio you're using. Since it's hard to future proof code, we generally recommend that you do not update the plugin. If you choose to update to a newer version, there is no guarantee that your code will work as expected, although it usually will. You can read more in the Troubleshooting Guide.
2. Run the code.
Before changing any of the code, make sure the starting code runs.
Now you're ready to start implementing navigation!
Now it’s your turn to complete this exercise yourself.
1. Download the starter code if you haven't already.
Instructions are in the previous exercise.
2. Create a fragment file.
Make sure a file is selected in the project first.
Select File->New->Fragment->Fragment (Blank).
- For fragment name, use
TitleFragment - uncheck create Layout XML
- uncheck include fragment factory methods,
- uncheck include interface callbacks
Then select Finish.
3. Cleanup the new TitleFragment class.
Open up the new TitleFragment, begin by deleting the four lines under the import statements, from the // TODO. Rename parameter arguments, choose names that match, down to the ARG_PARAM2 declaration. Then remove the return TextView(activity).apply section along with the SetText. The fragment won’t compile now because we have just removed the code that was returning the Fragment View or ViewGroup.
4. Inflate and return the fragment layout.
In our Activity, we used DataBindingUtil.setContentView to get the binding class from a layout, but since we’re in a fragment we need to call DataBindingUtil.inflate in onCreateView with the provided layout inflater, the layout resource ID, the provided viewgroup it will be hosted by, and false to not attach it to the viewgroup. Return binding.root. The code should look like:
//Inflating and Returning the View with DataBindingUtil
override fun onCreateView(inflater: LayoutInflater, container: ViewGroup?,
                         savedInstanceState: Bundle?): View? {
   val binding = DataBindingUtil.inflate<FragmentTitleBinding>(inflater, R.layout.fragment_title, container, false)
   return binding.root
}
5. Add the fragment to the activity layout.
Open the activity_main.xml layout. Go to the LinearLayout and create a fragment tag inside of it. You need to give a fragment created in this way an id and set android:name to the full path of our fragment class. Then set the layout width and height to match_parent, and you’re done.
6. Run your app.
Launch the app and revel in the glory of your first fragment!
If you want to start at this step, you can download this exercise code from: Step.01-Exercise-Creating-and-Adding-a-Fragment.
You will find plenty of //TODO comments to help you complete this exercise, and if you get stuck, go back and watch the video again.
Once you’re done, you can check your solution against the solution we’ve provided here Step.01-Solution-Creating-and-Adding-a-Fragment or git diff.
We’re ready to navigate! You’ll create a navigation graph for the trivia app, add the Title Screen and the Game Screen, connect them with an action, and navigate to the game screen when the play button is pressed.
(Note: The Navigation Editor and Component feature require at least Android Studio 3.3.)
1. Adding the Navigation Components to the Project
We've already added the ext variable for you within the Project build.gradle file that shows the version of the navigation component we will use. We have tested against the version shown, but you can see which version is the latest on this page on developer.android.com:
buildscript {
    ext {
        ...
        version_navigation = '1.0.0'
        ...
    }
Within the App build.gradle file, add the dependencies for navigation fragment ktx and navigation UI ktx.
dependencies {
    ...
    implementation "android.arch.navigation:navigation-fragment-ktx:$version_navigation"
    implementation "android.arch.navigation:navigation-ui-ktx:$version_navigation"
}
2. Adding the Navigation Graph to the Project
In the Project window, right-click on the res directory and select New > Android resource file. The New Resource dialog appears.
Select Navigation as the resource type, and give it the file name of navigation. Make sure it has no qualifiers. Select the navigation.xml file in the new navigation directory under res, and make sure the design tab is selected.
3. Replace the Title Fragment with the Navigation Host Fragment in the Activity Layout
Go to the activity_main layout. Change the class name of the existing Title fragment to androidx.navigation.fragment.NavHostFragment. Change the ID to myNavHostFragment. It needs to know which navigation graph resource to use, so add the app:navGraph attribute and have it point to the navigation graph resource - @navigation/navigation. Finally, set defaultNavHost = true, which means that this navigation host will intercept the system back key.
<!-- The NavHostFragment within the activity_main layout -->
<fragment
   android:id="@+id/myNavHostFragment"
   android:name="androidx.navigation.fragment.NavHostFragment"
   android:layout_width="match_parent"
   android:layout_height="match_parent"
   app:navGraph="@navigation/navigation"
   app:defaultNavHost="true"
   />
4. Adding the Title and Game Fragments to the Navigation Graph
Within the navigation editor, click the add button. A list of fragments and activities will drop down. Add fragment_title first, as it is the start destination. (you’ll see that it will automatically be set as the Start Destination for the graph.) Next, add the fragment_game.
<!-- The complete game fragment within the navigation XML, complete with tools:layout. -->
<fragment
   android:id="@+id/gameFragment"
   android:name="com.example.android.navigation.GameFragment"
   android:label="GameFragment"
   tools:layout="@layout/fragment_game" />
5. Connecting the Title and Game Fragments with an Action
Begin by hovering over the titleFragment. You’ll see a circular connection point on the right side of the fragment view. Click on the connection point and drag it to gameFragment to add an Action that connects the two fragments.
6. Navigating when the Play Button is Hit
Return to onCreateView in the TitleFragment Kotlin code. The binding class has been exposed, so you just call binding.playButton.setOnClickListener with a new anonymous function, otherwise known as a lambda. Inside our lambda, use view.findNavcontroller to get the navigation controller for our Navigation Host Fragment. Then, use the navController to navigate using the titleFragment to gameFragment action, by calling navigate(R.id.action_titleFragment_to_gameFragment)
//The complete onClickListener with Navigation
binding.playButton.setOnClickListener { view: View ->
        view.findNavController().navigate(R.id.action_titleFragment_to_gameFragment)
}
One more thing you might want to do. Navigation can create the onClick listener for us. We can replace the anonymous function with the Navigation.createNavigateOnClickListener call.
//The complete onClickListener with Navigation using createNavigateOnClickListener
binding.playButton.setOnClickListener(
        Navigation.createNavigateOnClickListener(R.id.action_titleFragment_to_gameFragment))
You’re done! That was a lot of steps, but you’ve built a graph, connected it to the UI, and made navigation happen.
If you want to start at this step, you can download this exercise code from: Step.02-Exercise-Lets-Navigate-Already.
You will find plenty of //TODO comments to help you complete this exercise, and if you get stuck, go back and watch the video again.
Once you’re done, you can check your solution against the solution we’ve provided here Step.02-Solution-Lets-Navigate-Already or diff
You’ll conditionally navigate to a different fragment based upon whether the player answers all of the questions correctly or not.
1. Add the GameWonFragment and GameOverFragment to the navigation graph.
Create actions connecting the GameFragment to the GameWonFragment and GameOverFragment. Move to the GameFragment Kotlin file.
2. Navigate from the gameFragment to the gameWonFragment under the “We’ve won!” comment
Under the “We’ve won!” comment, find the nav controller from the view, and then navigate to the action. To do this, call view.findNavController().navigate( R.id.action_gameFragment_to_gameWonFragment).
// We've won!  Navigate to the gameWonFragment.
view.findNavController()
   .navigate(R.id.action_gameFragment_to_gameWonFragment)
3. Navigate from the gameFragment to the gameOverFragment under the “GameOver” comment
Under the “GameOver” comment, call
view.findNavController().navigate(R.id.action_gameFragment_to_gameOverFragment)
// Game over! A wrong answer sends us to the gameOverFragment.
view.findNavController().
   navigate(R.id.action_gameFragment_to_gameOverFragment)
Now the game is more functional. When all the questions are answered correctly, the gameWonFragment is displayed. An incorrect answer causes the display of the GameOverFragment.
If you want to start at this step, you can download this exercise code from: Step.03-Exercise-Conditional-Navigation.
You will find plenty of //TODO comments to help you complete this exercise, and if you get stuck, go back and watch the video again.
Once you’re done, you can check your solution against the solution we’ve provided here Step.03-Solution-Conditional-Navigation or git diff.
Now it’s your turn to complete this exercise!
1. For the action connecting the gameFragment to the gameOverFragment, set the pop behavior to popTo gameFragment inclusive
Go to the navigation editor and select the action for navigating from the GameFragment to the GameOverFragment. Select PopTo GameFragment in the attributes pane with the inclusive flag to tell the Navigation component to pop fragments off of the fragment back stack until it finds the GameFragment, and then pop off the gameFragment transaction.
2. For the action connecting the gameFragment to the gameWonFragment, set the pop behavior to popTo gameFragment inclusive
Do the same thing with action from the GameFragment to the to the GameWonFragment.
3. Create an action connecting the gameWonFragment to the gameFragment and from gameOverFragment to the gameFragment with pop behavior set to popTo titleFragment exclusive
Add an action connecting the gameOverFragment to the gameFragment, and from the gameWonFragment to the game fragment. For each fragment, Select PopTo TitleFragment with the inclusive flag turned off.
4. Add an onClick Handler for the tryAgain button that navigates to the gameFragment
5. Add an onClick Handler for the nextMatch button that navigates to the gameWonFragment
And you’ve now implemented all of the navigation we’ll do with buttons.
If you want to start at this step, you can download this exercise code from: Step.04-Exercise-Back-Stack-Manipulation.
You will find plenty of //TODO comments to help you complete this exercise, and if you get stuck, go back and watch the video again.
Once you’re done, you can check your solution against the solution we’ve provided here Step.04-Solution-Back-Stack-Manipulation or git diff.
To add support for the up button, we first need to make sure our Activity has an ActionBar. We’ve already done this piece of the work for you, but to review:
1. Link the NavController to the ActionBar with NavigationUI.setupWithNavController.
Let's move to MainActivity. We need to find the NavController. Since we’re in the Activity now, we’ll use the alternate method of finding the controller from the ID of our NavHostFragment using the KTX extension function.
val navController = this.findNavController(R.id.myNavHostFragment)
Link the NavController to our ActionBar.
NavigationUI.setupActionBarWithNavController(this, navController)
2. Override the onSupportNavigateUp method from the activity and call navigateUp in nav controller.
Finally, we need to have the Activity handle the navigateUp action from our Activity. To do this we override onSupportNavigateUp, find the nav controller, and then we call navigateUp().
override fun onSupportNavigateUp(): Boolean {
   val navController = this.findNavController(R.id.myNavHostFragment)
   return navController.navigateUp()
}
If you want to start at this step, you can download this exercise code from: Step.05-Exercise-Adding-Support-for-the-Up-Button.
You will find plenty of //TODO comments to help you complete this exercise, and if you get stuck, go back and watch the video again.
Once you’re done, you can check your solution against the solution we’ve provided here Step.05-Solution-Adding-Support-for-the-Up-Button or git diff.

Okay… let's add an About menu!
We’ll begin by adding the AboutFragment to the navigation graph.
1. Add AboutFragment to the navigation graph
Click the "add" button. A list of fragments and activities will drop down. Add fragment_about. Name it with the title_about_trivia string. Set its id to aboutFragment. The menu will need this id to navigate to the correct fragment.
2. Create new menu resource.
Right click on the res folder within the Android project and select New Resource File. We’ll call this one overflow_menu, with resource type of Menu. Click on the overflow_menu within the menu directory, to view our new (empty) menu.

3. Create “About” menu item with ID of aboutFragment destination
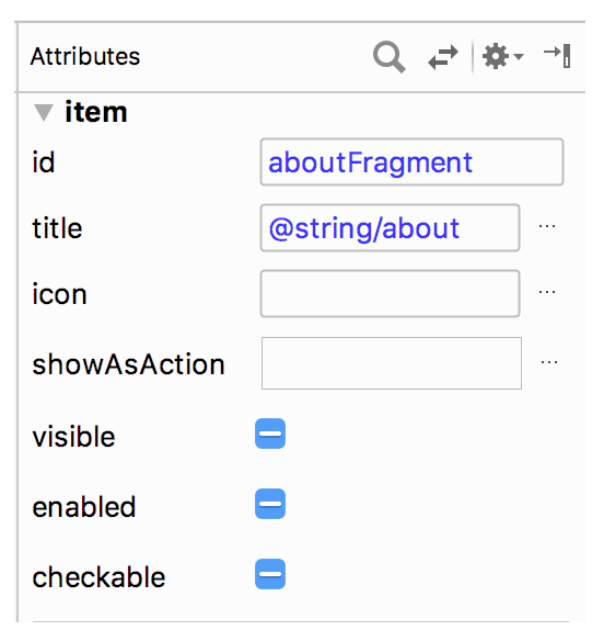
Make sure the design tab is selected. Drag a menu item from the palette into the component tree below. Move to the attributes pane. Set the new item's id to aboutFragment, its destination. That's the id you used when adding the About fragment to the navigation graph. For title, we can use @string/about. The rest of the attributes should be left as their defaults.
4. Call setHasOptionsMenu() in onCreateView of TitleFragment
Next we need to tell Android that our TitleFragment has a menu. In onCreateView call setHasOptionsMenu(true).
override fun onCreateView(inflater: LayoutInflater, container: ViewGroup?,
                         savedInstanceState: Bundle?): View? {
   ...
   setHasOptionsMenu(true)
   return binding.root
}
5. Override onCreateOptionsMenu and inflate menu resource
Next we need to override onCreateOptionsMenu and inflate our new menu resource using the provided menu inflater and menu structure.
override fun onCreateOptionsMenu(menu: Menu?, inflater: MenuInflater?) {
   super.onCreateOptionsMenu(menu, inflater)
   inflater?.inflate(R.menu.overflow_menu, menu)
}
6. Override onOptionsItemSelected and call NavigationUI.onNavDestinationSelected
Finally, we need to override onOptionsItemSelected to connect it to our NavigationUI.
override fun onOptionsItemSelected(item: MenuItem?): Boolean {
   return NavigationUI.onNavDestinationSelected(item!!,
           view!!.findNavController())
           || super.onOptionsItemSelected(item)
}
And that’s it. Run the app and enjoy the "About" feature we’ve just added to the title fragment.
If you want to start at this step, you can download this exercise code from: Step.06-Exercise-Adding-the-About-Menu.
You will find plenty of //TODO comments to help you complete this exercise, and if you get stuck, go back and watch the video again.
Once you’re done, you can check your solution against the solution we’ve provided here Step.06-Solution-Adding-the-About-Menu or diff.


0 Comments